1 Hour
1/4" wide ribbon
pop tabs
candle
matches
 You’ll need approx 3 tabs per inch of belt not counting the ties… (This will vary depending on how you cross your ribbons and tabs.)
My ribbon is 1/4" wide from Wal-Mart, ($0.40 for 10 yards on a spool; can't beat that. Just buy a spool of whatever color/s you want.)
Wash and rinse the soda can tabs, then allow them to dry.
Pull off any remaining circle things that attached the tabs to the can
Measure 18” of each ribbon, then knot them together (These 18” will be used to tie the belt)
(Knot at 18 inches pic)
Now measure the waist of your favorite skirt/pants. Double the length of the waist and add that length to the 18” (e.g. skirt waist is 29” so 58” should be added making 76" is the total length of each ribbon) (18 + (29*2) = 76)
Cut both ribbons that length.
Step 1) Slide the 1st tab onto the longer lengths of ribbon before the knot.
The ribbons should go over the left side of the tab and inside the holes (The smooth side of the tab should be facing up)The bigger hole should also be up
(anchor tab in place pic)
Step 2) 2nd tab--lay it in place behind the other one. The rough side should face up/toward the other tab.
(2nd tab in place pic)
The ribbon should go behind the left sides of the 1st tab and through the center holes from behind (The smaller hole of the 2nd tab should be facing up. The bigger hole of the 1st tab should be facing up.)
(2nd tab action shot)
(2nd tab side shot)
While stitching through the 2nd tab the ribbon should go through the center hole of the 1st tab
(the back tab will hold it in place)
(ribbon through 1st & 2nd tabs pic)
Step 3) 3rd tab—lay it in place (Pretty side up) (See how the holes overlap?)
(3rd tab in place pic)
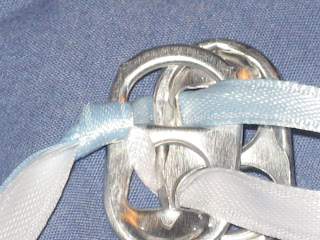
For a regular 'stitch' take the top ribbon through the top holes, and the bottom ribbon through the bottom holes
(1st reg top stitch action shot pic)
Finished stitch
(finished reg stitch pic)
If you keep making this kind of stitch, you will have a belt like this on both sides (except the top color will be all one ribbon and the bottom color all the other ribbon)
(reg stitched belt pic)
I make mine with X’s by crossing the ribbons, (because it’s prettier)
Step 4) To make an X stitch take the bottom ribbon, and stitch it through the top holes
(beginning X stitch pic)
Then stitch the top ribbon through the lower holes
(completed X stitch pic)
I usually do regular stitches on one side and x stitches on the other, so my belts can be worn on either side if you want to change things up. But sometimes I mix x stitches and straight stitches.
Keep doing step 2 and step 3 or 4 until your belt is long enough.
I usually do regular stitches on one side and x stitches on the other, so my belts can be worn on either side if you want to change things up. But sometimes I mix x stitches and straight stitches.
Keep doing step 2 and step 3 or 4 until your belt is long enough.
You can do all ‘X’ stitches, all straight stitches, or a mix of both. You can also leave all the bigger ends of the tabs facing up for a slightly more fragile—and more delicate looking—belt. (Thats how I did the belt in the top pictures--Aka Sharron's belt.)
So when you have all the tabs you want on, knot the ribbon to your last pop tab. You should have some ribbon left.
Cut this ribbon off at an angle then seal the end by holding up to an open flame. (This prevents fraying.)
Don’t hold the ribbon in the flame; just hold it close to the flame at an angle. You should be able to see the end melt/draw up a bit. Melt the ends of the 18" that are used to tie the belt also.
After the jump more info for picky people like me


